User Guide / Case Study
The Newsletter Bundle connects the newsletter editorial functionalities in Ibexa with the newsletter sending tool Maileon.
Much of the experience of the editor depends on the specific project and any user guide is necessarily a case study. Therefore, the Content types (please refer to the Content type definitions section) and workflows presented in the following examples are specific to a particular project and not a fixed pattern, provided for reference only.
Components
The Newsletter Bundle is only one of the components you need to create a Newsletter Platform based on Ibexa DXP. Below we describe how a customer used Ibexa Experience, the Newsletter Bundle and other xrow components to deliver a content management system with daily newsletters generated from website content.
We used Ibexa Experience, xrow/tracking-bundle, xrow/workflow-bundle and other components, together with customer-specific code.
How to create a new newsletter
Each siteaccess has a folder where Newsletters are stored.
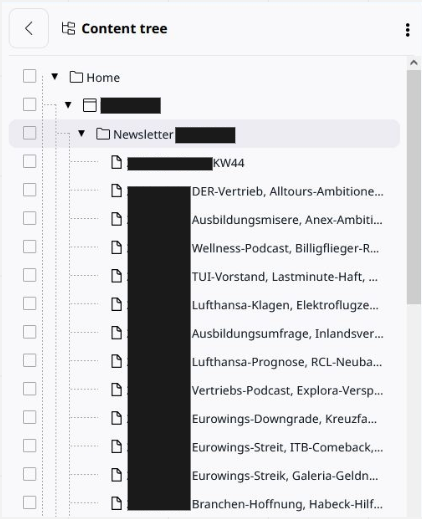
Fig. 1: The location to create newsletter content
1) Create new Newsletter Content
Newsletters have content type Newsletter.
When you create a new newsletter of this type, first select Default layout for Newsletter.
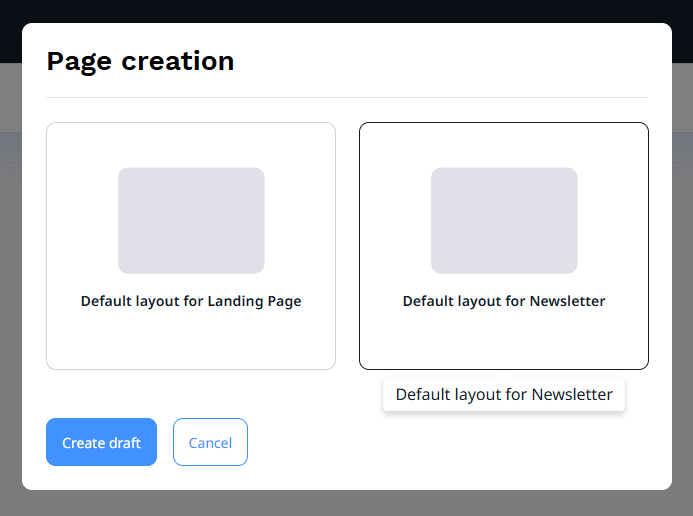
Fig. 2: Ibexa PageBuilder layout selection modal
2) Edit the Fields of the Content
Next, open the Fields dialog and fill in the mandatory Subject and Publication date fields.
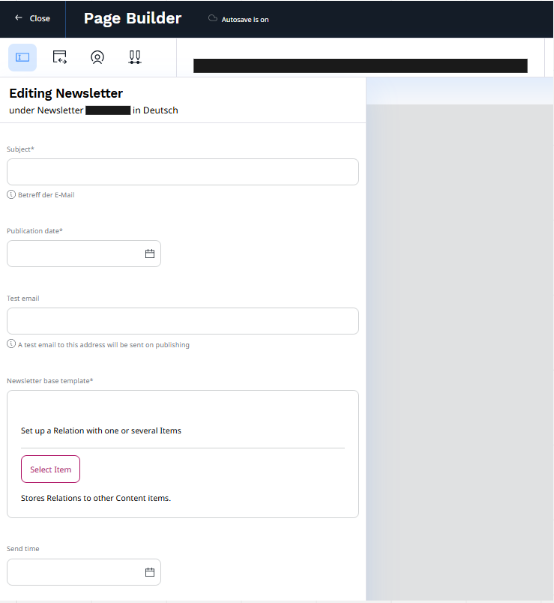
Fig. 3: Ibexa PageBuilder fields modal for newsletter content type
Then choose the Newsletter base template.
This must be a content of type Newsletter Basis and it defines which subscriber list the newsletter will be sent to, the email address used for sender and which design theme will be used to render it (things related to the style of the newsletter such as logo, footer text, colours and source of advertisements).
To send a test of the newsletter when you publish it, enter the email address in the Test email field.
Leave the Send time field empty until you are ready to send out the newsletter. This is a time input field. If it is empty, after clicking the publish button, this Newsletter Content will be sent to the Maileon server, but its status in Maileon will remain as draft. If this time input field is not empty, after clicking the publish button, the Newsletter Content will be directly added to Maileon's "scheduled" list. Once the sending time arrives, Maileon server will send this Newsletter to all subscribers.
Newsletter Basis
a) How to categorize newsletters by website (or channel)?
We can create two types of Content, SubscriberList and SenderList, under different websites (or channels). Then, in the Newsletter Basis Content, we can associate the SubscriberList and SenderList Content with the corresponding website (or channel), allowing the editor to send (or categorize) the current newsletter to different accounts or categories through the SubscribeID configured in the SubscriberList Content (this is more important for multi-account APIs), while sharing the same design theme, such as the same logo, footer text, colors, and advertisements.
The E-Mail and Sender ID in the SenderList Content are only valid for the Sendgrid API. They can be ignored for the Maileon API.
A current limitation is that each siteaccess can only have one SubscriberList content.
b) How to add advertisements in a newsletter?
First, we can create two folders in the Media category to store ads of different sizes for display in different positions in the newsletter. Then we can associate these two ad folders with the Advertisment Content Field in the Newsletter Basis Content.
Note that the order of association is relevant to the position of the ad. For example, in the test project, the relevance can be seen in the screenshot below.
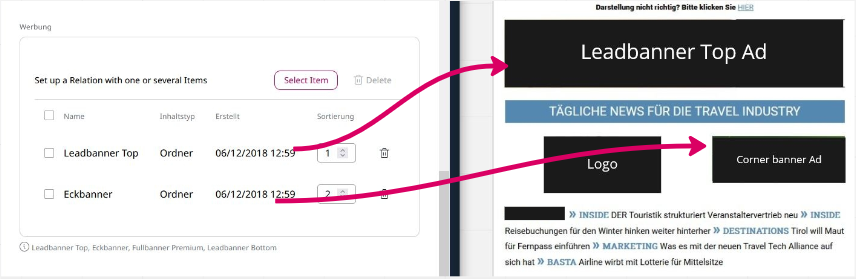
Fig. 4: The display position of advertisements on the Newsletter page
If we need to display ads in other positions in the newsletter, we need to modify the logical code and relevant templates to fit the ads we want to associate.
c) How does the ad workflow work?
- First, we create a new Content of type
Advertisementin the advertising folder. - Upload the advertisement image in the Content Field
Image. - If the advertisement image has a link, the corresponding URL can be added in the Content Field
Link. If the xrow/tracking-bundle is also installed in the project, the URL will be converted into a link that can be tracked for click events to track the advertisement click-through rate. The specific tracking results can be found in theTrackingtab of theAdvertisementcontent page in the Ibexa backend. - Finally, add a time range for the advertisement in the Content Fields
Starts onandEnds on. When the publication time of the Newsletter associated with the advertisement falls within this time range, the advertisement will appear in the designated position of the Newsletter. Otherwise, the advertisement content will not appear. It should be noted that if multiple advertisement time ranges meet the requirements at the same time, only the latest publicly announced advertisement will be selected to appear on the Newsletter page. - It should be emphasized that the time period in which an advertisement appears on the newsletter page is only related to the dates added in the
Starts onandEnds onContent Fields of the corresponding Content. However, if the project also installs xrow/workflow-bundle and sets theOnlineandOfflinedates for the advertisement Content through this bundle, it is important to note that the Content'sOnlinedate must be earlier than or equal to the date entered inStarts on. The Content'sOfflinedate must be later than or equal to the date entered inEnds on. Otherwise, it will also affect the timing of when the advertisement appears on the page.
3) How should an editor fill the content of a newsletter?
Our Newsletter content type is a landing page because it contains a Content Field of type ezlandingpage (a field type provided by Ibexa Experience and not available in the Open Source version). By adding various Page Blocks, we can populate and enrich the content of the Newsletter, just as editors usually edit content of the landing page type.
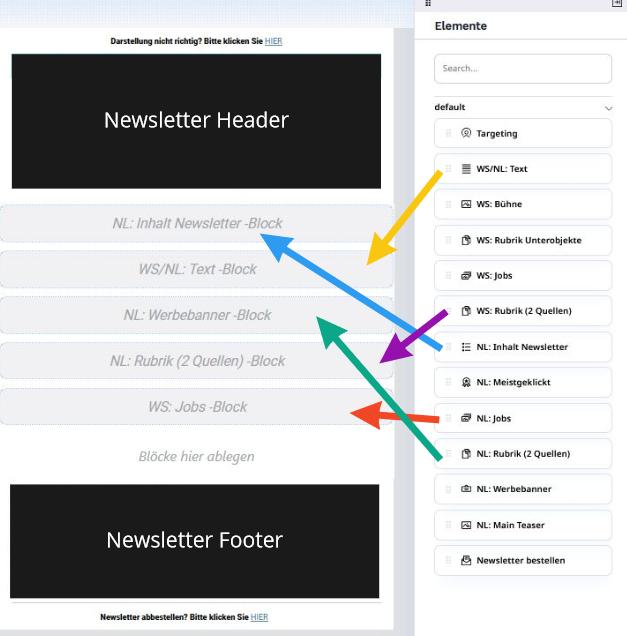
Fig. 5: How to add Page Block in Newsletter content
These Page Blocks are defined by configuration and code in the specific project implementation, not the Newsletter Bundle. The requirements of every project will vary. It's also possible to create Newsletters that don't rely on the ezlandingpage field type.
For the sake of clarity, and to show what is possible, we will demonstrate several different page blocks here:
a) NL: Rubric (2 Sources) Block
The purpose of this Block is to display the latest four content locations under a certain category in Line View, and insert a related non-expired advertisement at the end of the Block.
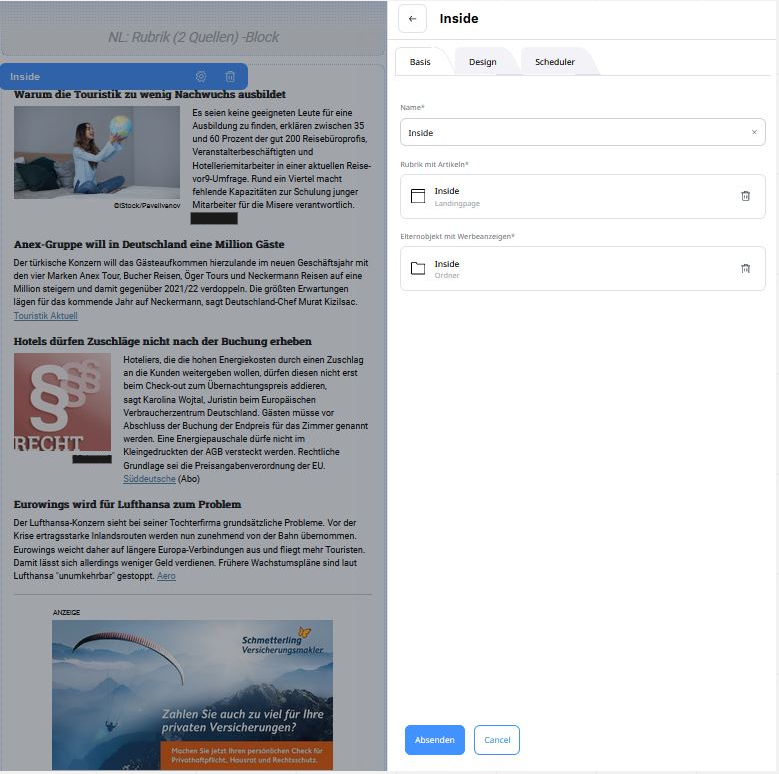
Fig. 6: Rubric (2 Sources) Block
-
On the Block configuration page, we can associate a parent location of type
landing pageorfolderin theSection with articlesattribute. The latest four contents of typearticleunder this location will be displayed in the Line view style. -
In the
Parent object with advertisementsattribute, we can associate a parent location ofadvertisementtype. The latestAdvertisementtype content that has not expired under this location will be displayed at the end of the block.
b) NL: Advertising Banner Block
This block can display ads between different blocks of newsletter content. For specific details on displaying ads, please refer to the section 'How does the ad workflow work?'.
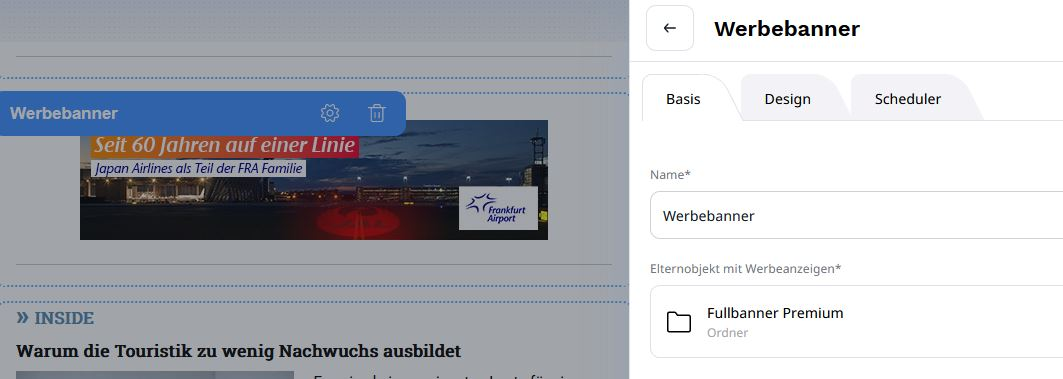
Fig. 7: Advertising Banner Block
Simply associate the parent location of a type of advertisement in the Parent object with advertisements attribute, and the latest, non-expired content of the Advertisement type will be displayed.
c) NL: Newsletter Content Block
The purpose of this block is to display all related articles as a list with the parent category name and article title, and add an anchor on the parent category name, which can jump to the corresponding category block added in the Rubric (2 Sources) Block in the newsletter. In addition, the sending date of the newsletter is also marked at the front of the list.
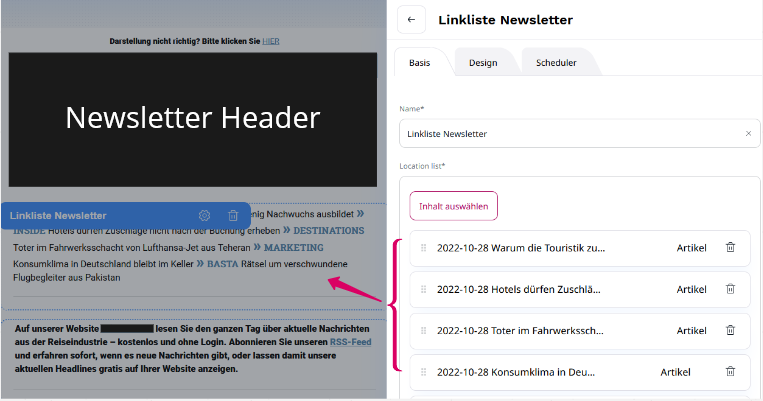
Fig. 8: Newsletter Content Block
Add all Content of the article type that you want to associate to the location list attribute. There is no limit to the number of associated articles, but it is recommended to only associate one article with each category to avoid duplicate category names in the list.
How to send a newsletter
After the Newsletter Content has been created, we are faced with three possibilities:
1) The current version is the not final version before sending, that is, further modifications are needed.
2) This version is the final version and does not need to be modified again.
3) It is necessary to send this version of the Newsletter to a specific Email address for testing.
If it's the first case, it means the current version of the newsletter is not the final version and still needs to be edited and modified. Please keep the Send time field blank. After clicking the Publish button, the content of the newsletter will be sent to the Emailings => Drafts category in the corresponding Maileon account backend. This means that the newsletter will not be sent to subscribed users by Maileon servers, and the corresponding newsletter content can be modified and updated at any time.
If it is the second case, it means that the current Newsletter version is the final version and no further editing or modification is needed. Please fill in the specific sending time of the Newsletter in the Send time field. As a required field, the Publication date should have already been filled in with the sending date. After clicking the Publish button, the content of the Newsletter will be sent to the Emailings => Active & Scheduled category in the corresponding Maileon account backend. This means that the Newsletter will be sent to the subscribed users by the Maileon server on the date and time set in the Publication date and Send time fields.
If it is the third case, the editor can directly enter the email address that needs to receive the newsletter into the Test E-Mail field in the newsletter-content. After clicking the Publish button, the content of the newsletter will be automatically sent to the email address that was just entered.
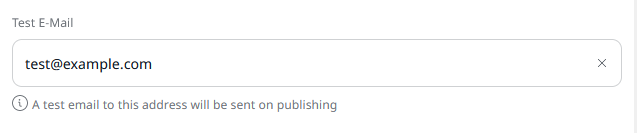
Fig. 9: Send test newsletters to specific email addresses
How to copy a newsletter
We can use the copying method to quickly create a new newsletter based on existing "Newsletter Content".
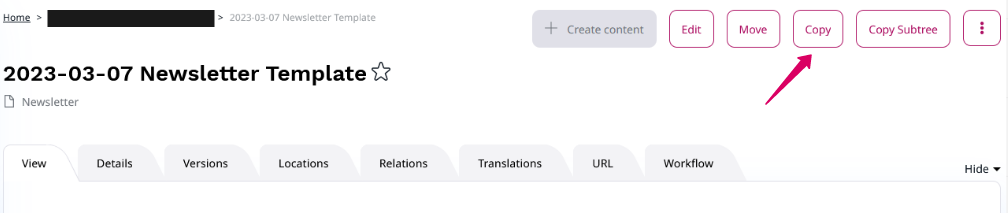
Fig. 10: Copy Newsletter Content
After completing the copy process in the Ibexa backend, we will find the newly generated newsletter under the Emailings => Drafts category in the Maileon backend.
Its naming convention is as follows:
The original newsletter name + "-" + the new content ID.

For example: "2023-03-07 Newsletter Template-157880"
Of course, we can rename and modify the content of this Newsletter at any time in the Ibexa backend.
How to delete a newsletter
When an editor performs a deletion action such as Send to Trash or Delete on a content of the "Newsletter" Content Type in the Ibexa backend, the copy of the newsletter that has been sent to the Maileon server will also be deleted at the same time. It is irrelevant which category the newsletter exists in the Maileon backend. This means that even if the newsletter has already been added to the sending queue on the Maileon server, it will be directly removed from the queue if it is deleted in the Ibexa backend.
To ensure accuracy, it is highly recommended to double-check when performing a delete action on newsletter content in the Ibexa backend.
How the newsletter subscription process works
We should be able to find a subscription Newsletter form on the website frontend. It could be embedded in a frontend page or presented as a pop-up form in different display formats. The form should include at least one input box for an email address and be able to validate the inputted email address.
Due to the diversity of styles and requirements for subscribing to the newsletter, we cannot provide a fixed form template. For different projects, subscription forms can be developed according to their respective needs. For specific development details, please refer to the How to create a Newsletter Subscription Form section of the development guide.
Here is the simplest subscription form provided as a reference example:
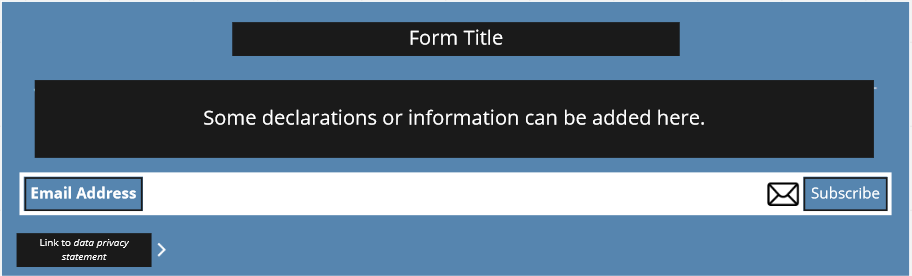
Fig. 11: Newsletter subscription form
After correctly inputting an email address into the email address input box, clicking the Subscribe button will result in receiving a Confirm Newsletter Registration email in the email address that was just entered, assuming no errors occur. This is because the email address we added is initially in an inactive state in the contact list of Maileon service. By clicking the link to activate the email address, the registered email address will transition to an active state in the contact list of the Maileon server. Subsequently, this email address will be able to receive newsletters sent by the Maileon server on a regular basis.
The process of unsubscribing is also simple. Just find the phrase Unsubscribe from the newsletter? Please click HERE. at the bottom of the Newsletter page, click on the corresponding link, and answer a few questions about the reasons for unsubscribing. Then you can unsubscribe from the Newsletter.
Conclusion
All workflows in this user guide are based on the email marketing software platform Maileon. The NewsletterBundle can be adapted to the API of different email marketing software platforms (such as SendGrid), and workflows may vary depending on the platform. Therefore, this user guide should be used as a reference only.